Sasa
Serendipity: the occurrence and development of events by chance in a happy or beneficial way. No better word could describe the natural unfolding of things on this side of the screen. When I was writing part 1 of this article, I started documenting my process and Notion grabbed my attention. I mean, I haven’t been living on Mars, so I’ve known about the existence of this tool, but I assumed it was a mere notepad. Minimal indeed. No thought was more wrong than this! I started looking into it in depth, and I was left speechless. Of course it was a bit difficult at first to understand the idea behind Notion, especially coming from a Trello-centric point of view. Notion allows you to take notes, create databases, organize views, having things interacting with others. Basically you can model entities and organize them, in a structure that you, and only you, decide. It can be a bit overwhelming to have an empty structure that needs to take shape according to your needs: compared to other tools, it needs a bit of planning ahead and an understanding of your needs, case by case. Of course there are a lot of templates available for free, that you can use to kick off. As far as I’m concerned, there are enough elements for me to try it out and give it a chance, but let’s go step by step.
Start small: A little goes a long way
Of course, the temptation to migrate everything into Notion immediately was huge. Instead I opted to take baby steps to get into it. After exploring some of the templates, I decided to activate “nerd mode” for my own template (“Bankai” mode for all my Bleach stans, if you will). So my first thought was to find some areas or aspects of my “note taking” process that need a bit of structure and focus, something that I was failing to do with Trello. I thought about these 2 elements:
- Job applications: lately, I’ve found it a bit overwhelming to consolidate all the information I have about my job applications. Information like the openings that I’m following, the last interaction I’ve had with the HR, the company, my impressions, etc…;
- Cranky Box’s invoicing workflow: working as a freelancer means that you also have to take care of some basic admin work. When you have more than one client, tracking the status of the invoices and payments can be hell.
How can Notion help me? Unleash the nerd!
Problem 1: Sort out the job applications
Lately, I’ve been receiving plenty of invitations to job interviews. Usually they begin with a cold call, a message on LinkedIn or an email and then they become an appointment on my Google Calendar. It can easily become a hot mess when the applications are introduced in the next step:
- I want to know exactly at what point of the selection I am;
- I want to make extra notes about the process, such as: research about the companies, the technologies used, the salary range, the place of work, the people I meet and moreover, the feeling I get from the interview;
- It would be nice to know how many days have passed since my last interaction with the HR of the company, to gauge if I should send an email or simply consider that process as dead;
Going through several iterations with Notion, I found it very practical to create 3 tables: one called “Job Openings”, “Interviews” and “Companies”. The idea is to extract all the pertinent information about the meetings straight from Google Calendar directly into “Interviews”, to collect, arrange and expand them in “Job Openings”, while the table “Companies” will hold more information about the company posting the job.
Every job opening originates from a company, so let’s begin here, by creating a table containing:
- Name: the name of the company. This column will contain a set of pages, one for every row. It so happens that I’ve interacted with once-unfamiliar companies more than once in my career, so it’s useful to record general info about the companies you are introduced to. Each page may contain nearly everything: it may become your dashboard for projects to do with that company. Let it grow with you! For the purpose of this project, this column is enough: although I’ve added a few other details, like the hiring date and the months of service, just for fun;

After the company section, we need to work on the “Job Openings” table: in a few columns we will draw up and expound on a table that will be the link between “Companies” and “Interviews”, containing all the information we might need to monitor our processes. So, the columns are:
- ID: a unique identifier of the process;
- Company: a relation to the table “Companies”, displaying the company’s name, but also containing a link to the Company’s specific page;
- Posted role: a page containing information about the posted role;
- Current step: a “rollup” to the “Interviews” table. It simply counts the interviews that we’ve booked for that posting. We will get there in a moment;
- Mood: the overall mood of the process, it’s a multi-select column. Although not essential, it was really helpful since it reminded me of the tone of conversation of the process;
- Intermediary: a simple text column to inquire if the posting was from the company, an head hunter, etc..;
- Last Interaction: a rollup with “Interviews”, gives us the date of the last call we had at a glance. I usually consider a process dead if I hear no news in 2-3 weeks;
- AGS: Annual Gross Salary, it’s a number - we can set the type to currency;
- Presence: a single select telling me if the position is Fully Remote, Hybrid or On Site;
- Status: a single select which tells me at a glance if the process is Done, Ongoing or Stopped;
- Interviews: a relation to “Interviews”, grouping all the meets of that process;

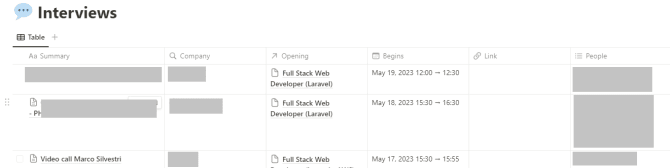
“Interviews” is composed of the following columns:
- Summary: the title of the Event;
- Opening: a relation to “Job Openings”, to better identify the job opening related to the interview;
- Company: a “rollup” from the column “Opening”, linking to the “Job Posting” column. You will understand this in a bit;
- Begins: contains the time slot of the Event;
- Link: the link to the Hangout;
- People: the attendees of the Event
Here is where we see some magic: through the use of Zapier - a service similar to IFTTT, but with a more generous free tier - we can configure a Zap, an applet that will read the Google Calendar events under the “General” label and put them into the “Interviews” table. Embarrassing as it is, I couldn’t find another way to label the events. Don’t forget to authorize Zapier to access your Notion’s specific table: go to the page containing table, click on the three dots on the top right corner, click on “Add Connection” and select Zapier. Done. The trickiest part here is to do the mapping between the Calendar and the table, but don’t worry: I’ve cooked up something for you. The only condition is to use a table similar to “Interviews” table. Once you’ve successfully created a Zapier account, you can activate the zap here. As soon as you start getting more events, by filling in the company and opening columns, the magic will start. This setup wasn’t super intuitive at the start, since I knew little about Notion, but after some tinkering, I found it extremely easy to use! I would like some more automations, for example getting the posting straight from LinkedIn, or Monster, or Indeed, but unfortunately there are no API for such, hence no integration out of the box. Yes, I could write a scraper to do the fetching for me, but writing and maintaining such a piece of code would be too much effort compared to the benefit. I also thought of using some automation on my Gmail account to filter possible job openings and send them directly to Notion: unfortunately, there was a change of API on the big G side, so for now these types of actions are only available to business accounts. Did it work? Well, I’ve landed a job and the best thing is that I had other means of comparison with my other processes, enabling me to make an informed choice. The icing on the cake: I’ve got more knowledge about the other processes, like the average response time, where I failed or who simply disappeared. All information that might be extremely useful in the future.
Problem 2: Streamline my invoicing process
Freelancing might seem sweet, till you come face to face with your admin duties. Now, there is specific software to take care of all the tasks, plus my accountant. I’d be so lost without him! However, there is something that needs to be done and be done right to get your money: invoicing. When you work with more than one company and you do not use a digital invoicing system, keeping track of what you sent, the amount received, when, the date of expiry of the invoice might be a huge loss of time, especially because you need to have a clear picture of what’s happening. Previously I used Google Sheets and Google Drive to monitor that process. Why did I choose to migrate to Notion then? So as to have everything under the same umbrella. It’s a far less complicated setup than the previous one - in this case it’s just a table. There are a couple of interesting things here: one is that you can upload files straight into a field and the other one is that you can use formulas within a column. But be careful, it uses a language that is a far more complicated than the one in Google Sheets. The “Invoices” table is so far composed of:
- Invoice N.: the unique invoice number;
- Invoice: the final invoice sent to the client;
- Company: a relation to the Companies table, containing a direct link to the company page;
- Billing period: I failed to set a date interval here, so I used a multi-select, containing the months and the year related to the specific invoice;
- Issued: a date field with the date I have issued the Invoice;
- Due on: a date field telling me when I should receive the money. In my case I discovered that one of the companies I am working for is constantly delaying my payments. Such a tool might help me calculate my legal interests. Smart, no?
- Paid on: when I actually got the money. Needless to say, it’s a date field;
- Status: a single select that represents the status of the invoice. Draft or already sent to my accountant?
- Gross: a number field that contains the gross amount;
- Withdrawn: how much of the gross I withdrew;
- Withdrawable: this is a formula, specifically prop(“Gross”) - prop(“Gross”) * 0.3, to calculate the net, which corresponds to the 70% of the gross;
- Residual: another formula if(dateBetween(now(), prop(“Paid on”), “days”) >= 0, prop(“Withdrawable”) - prop(“Withdrawn”), 0). I usually transfer a bit less of the “Withdrawable” amount, in order to always have an amount available to pay for the cost of the account and the accountant. This is wrapped in an if block, because I should check if the Invoice was paid before doing my math.
Was Notion helpful? Yes! Because now I can easily filter this table and attach a view in every company’s page. In the future it will help me build a customized dashboard for every company I work for, or even attach the invoicing process to a to-do list, maybe even have reminders on Slack. We’ll see how it evolves. And you know what? I can even export this table into a pdf and send it to my accountant for him to do a cross-check!
And for the Rockebook? Zapier comes to the rescue
Around the end of May 2023 IFTTT reduced the limit for the free tier even more: from 5 to 2 applets running at the same time. That limit is a bit too tight. On the other hand, paying the monthly fee just for the extra applet that would run occasionally doesn’t really seem worth it. So, I remade the older applet in Zapier, and now it’s a zap, which you can grab here.
Mind-maps? Post-IT (again), Miro and Notion
I have already talked about the Post-IT app: stick your notes on the wall, scan them and edit them later. With the Post-IT app you can send the notes to Miro and embed the board into Notion just by typing /miro and pasting the link of the board. The only flaw is that it works only in one direction: in Notion you can only see the board, but not edit it. Well, better than nothing. And speaking of sticky notes, I have found the best method to keep them sticking the way they should. Have a look at this video and embrace the change!
Read-only extension for VS Code
On the VS Code side there is really nothing that allows you to take your notes from the IDE. I’ve only found this extension which unfortunately supports only the read-only mode. I’m mentioning it to give you the full picture.
And the nerdy bit? In case you haven’t had enough yet
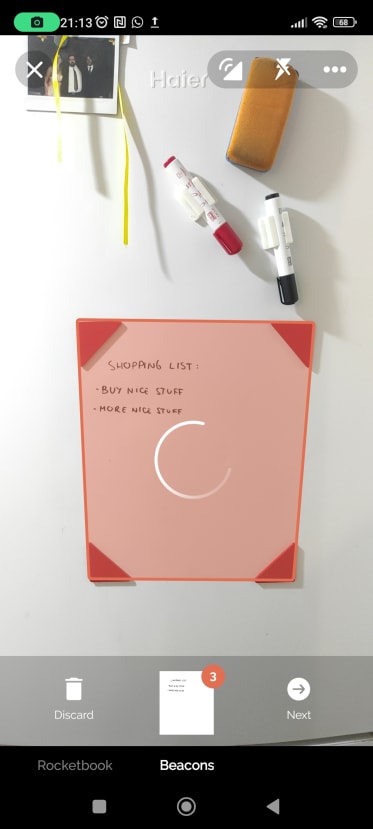
Well, using what I know so far, I decided to take it a step further: making my fridge a bit smarter with a Rocketbook, a 3D printer (but you can use some paper!) and the mysterious power of permanent magnets. Toss these in with a zap and a Notion page and you will obtain an infinite grocery list! Rocketbook came up with these things called “Beacons”; 4 triangles of special sticky paper that once stuck on a surface, can make it smart, and act exactly like a Rocketbook page. This paper is hard to find and a bit expensive for just 4 small triangles. Rocketbook itself came up with a DIY solution, so in case you don’t have a 3D printer, you can get the gist of it from their official Youtube channel:
Basically, you cut 4 pieces of colored paper and cut them in a triangular shape as shown in the video, then stick them anywhere and you are ready to go. Otherwise, if you own a 3D printer, you can print 4 of these Beacons and apply a bunch of magnets and stick them to your fridge (or any other magnetic surface). Then again, you can create another folder in your Google Drive, configure the destination and duplicate this zap. Do not forget to activate the zap connection in the Notion page and you are set: now you can enjoy your infinite whiteboard. Just a quick note: it only works on white surfaces and the color does not matter, as long as there is high contrast between the beacon and the board.
Conclusion
Needless to say, as I am yet to discover and unlock the full potential of the Notion app, I’ve already migrated all the Rocketbook automations I described in part 1, and I am still exploring all the features and the possibilities. It was intimidating at first but I’ve began to enjoy it. As much as I try, I can’t think of any good reason to stop using it. For now…
Happy building ⚒